
You may or may not know about the colorful chewy candy called candy corn. It is most commonly seen around fall time because it is shaped like little kernels of corn. This candy is one of my MOST FAVORITE candies!!! These candies, the traditional yellow, orange and white striped candy corn are supposed to represent Indian corn, during the time when the pilgrims came to America.
Each one is approximately the size of a kernel of corn. Even though Thanksgiving is a couple of months away you could save the following poem and project from craftsayings.com to share with loved ones this year as a memento of God’s provision even in the hard times. What a tasty tribute to our Early American History!

Five Kernels
© 2000 by shirleyt@craftsayings.comThe first winter in Plymouth was very cold
And hunger abounded as the year unrolled.
Some days each only had five kernels of corn.
Their lives were becoming sad and forlorn.
But then spring came and their harvest grew.
The pilgrims began to thrive and their spirits did too.
But they never forgot the bleak times after they did abate
So on Thanksgiving they'd put five kernels on each plate.
The first kernel reminded them of the autumn beauty.
The second one of the freedom that they held dearly.
The third reminded of their love and care for each other
And the fourth was for dear friends like the Indian brother.
The fifth kernel reminded of God's love and care for all.
So as you prepare and celebrate Thanksgiving this fall,
Remember to put five little kernels on each dinner plate
To honor the pilgrims and give thanks for our good fate.
Place Setting Marker:Put five kernels of corn or candy corn in cellophane and tie closed with a fall-colored ribbon. Large field corn kernels looks great, but popcorn kernels can be used also. Kids love it with candy corn!
Print Poem. Trim edges.
Fold a piece of construction paper in half to make a tent sign. Center poem on it and glue down with a glue stick. Trim edges.
Glue the corn in upper left corner.
Write name across the top with a silver or gold glitter pen and put on or near plate as a place marker.
Cards:Fold construction paper or cardstock in half and in half again so that it is quarter sheet size. Follow instructions above.
Or just print the poem on cardstock and attach corn.
Believe it or not, these candies are not only used during the fall, but also around Valentine's Day, Christmas, and Easter depending on the colors. Green and red are used for Christmas, and so on. Candy corn was originally created by the Wunderlee Candy Company around the 1880’s. Later, in 1990 it was produced by Goelitz Company, which is now the Jelly Belly company.
Candy Corn is not the healthiest, like most candy. Candy corn is made mostly of sugar corn syrup, honey, and carnauba wax. It contains fatty acids, hydrocarbons, and cinnamac acids.. Surprisingly, candy corn didn’t used to be composed of the ingredients it is composed of now. Candy corn originally consisted of: sugar, corn syrup, fondant, and marshmallow!
Do you know what carnauba wax is? If you know then it may have spoiled your appetite for candy corn. If you don’t know then it may spoil your appetite for candy corn, and if you don’t want it spoiled then, WARNING: DO NOT READ THE FOLLOWING!!!!!
Carnauba wax is usually used as a gloss on cars! And is in shoe polishes! Can you say EWWW? This wax is also found in dental floss, tic-tack, frosting, chewing gum, Altoids, and in other foods! Isn’t that just sick and wrong? It almost makes me not crave candy corn…almost.
There are lots of fun ways to eat candy corn and many cool recipes you can find that include candy corn.
This recipe for Candy Corn Bark can be found at: http://candy.about.com/od/specialoccasions/r/candycorn.htm . This is obviously 100 % NOT nutritious, but it is a fun, special treat!
· 2 cups semi-sweet chocolate chips
· 1 cup white chocolate chips
· 1 cup candy corn
Preparation:
1.Prepare a cookie sheet by lining it with aluminum foil.
2. In separate bowls, melt the chocolates in the microwave or over a double boiler.
3. Stir ½ cup candy corn into the dark chocolate, and pour the chocolate onto the foiled pan. Using a spoon or spatula, smooth the chocolate out in an even layer. It does not have to cover the whole pan.
4. Take a spoon and scoop small amounts of white chocolate over the dark chocolate in a random pattern. Use a toothpick or the tip of a knife to swirl the two chocolates together. Don’t swirl too much, you want to be able to see the distinct chocolates in the end.
5. Place the remaining ½ cup candy corn over the wet chocolates, sprinkling randomly and pressing them gently into the chocolate until they adhere.
6. Put the chocolate in the refrigerator for 30 minutes to harden.
7. When the bark is firm, remove it from the foil and break it into pieces.
Ingredients
8 cups popped light butter microwave popcorn (about 1 [3-ounce] bag)
1 cup candy corn
1/4 cup butter
1/4 teaspoon salt
1 (10-ounce) bag marshmallows
Cooking spray
Preparation
Combine popcorn and candy corn in a large bowl.
Melt 1/4 cup butter in a large saucepan over medium heat; stir in 1/4 teaspoon salt and (10-ounce) bag marshmallows. Reduce heat to low; cook for 7 minutes or until the marshmallows melt and the mixture is smooth, stirring frequently.
Pour marshmallow mixture over popcorn mixture, stirring to coat well. Lightly coat hands with cooking spray; shape popcorn mixture into 20 (2-inch) balls.
Note: Children should be sure marshmallow mixture is cool enough to handle before touching to prevent burns!
From: http://www.MyRecipes.com
And of course, if you would not like car wax to be in your candy corn, I found an awesome recipe for home-made candy corn on:
http://kids-cooking.suite101.com/article.cfm/how_to_make_homemade_candy_corn
Still not the healthiest choice, but it is healthier than the store bought kind.
Ingredients
· 2-1/2 cups of powdered sugar
· 1/3 cup nonfat powdered milk
· 1 cup regular sugar
· 2/3 cup corn syrup
· 1/4 teaspoon of salt
· 5 tablespoons of salted butter
· 1 teaspoon of vanilla
· Yellow and red food coloring
Directions
1. Bring the regular sugar, corn syrup and butter to a boil over medium high heat in a large heavy saucepan. Reduce the heat to medium and continue boiling for 5 minutes, stirring occasionally. Remove pan from heat.
2. While boiling the above, put the powdered sugar, powdered milk and salt in a large bowl and set it aside.
3. Add the vanilla and powdered mixture into the hot mixture in the saucepan. Be sure and mix it well. Then let the mixture sit for about 20 minutes or so until the mixture is slightly warm.
4. Divide the dough into 3 equal parts and put one in each of a small mixing bowl. Add orange (mix red and yellow together) food coloring to one part and yellow food coloring to another. Knead the dough until the color is well blended. Also knead the white dough until smooth. You may want to put on plastic gloves or a zip-loc bag to protect your hands from the food coloring.
5. Roll each piece into a thin rope of equal length. Press the three ropes together to make a long rectangle. Using a sharp knife, cut the ropes into triangles and shape with your fingers. You will have some with white tips and some yellow tips.
6. It is best to store between layers of waxed paper so they do not stick together.
Ah ha! I found an organic recipe from the same website! This one is a BIT healthier than the others, but it is still supposed to be a treat.
Ingredients
· 1 cup of sugar
· 2/3 cup of organic or low fructose corn syrup
· 5 tablespoons of vegan butter (like Earth Balance)
· 1 teaspoon of vanilla
· 2-1/2 cups of powdered sugar
· 1/3 cup of powdered soy milk
· just a pinch of sea salt
· Red and yellow food coloring
Directions
1. Bring the regular sugar, corn syrup, vanilla and butter to a boil over medium high heat in a large heavy saucepan. Reduce the heat to medium and continue boiling for 5 minutes, stirring occasionally. Remove pan from heat.
2. Mix the powdered sugar, powdered milk and salt together in a bowl, and then add this to the hot mixture. Stir well. Let it all stand for about 20 minutes to cool down to just warm.
3. Divide the dough into 3 equal parts and put one in each of a small mixing bowl. Add orange (mix red and yellow together) food coloring to one part and yellow food coloring to another. Knead the dough until the color is well blended. Knead the white dough until smooth. You may want to put on plastic gloves or a zip-loc bag to protect your hands from the food coloring.
4. Roll each piece into a thin rope. Press the three ropes together to make a long rectangle. Using a sharp knife, cut the ropes into triangles and shape with your fingers. You will have some with white tips and some with yellow tips.

All these candy corns will be larger than what you get in the store. It would take forever to make them that small. Enjoy these homemade candy corns and don’t forget to share
There are now new flavors such as Caramel Apple Candy Corn and new Hershey’s kiss candy corn! Our family tried the caramel flavor just the other day and those of us who like caramel really liked it. We also saw Indian Corn Candy Corn made with real cocoa, but I think the traditional white, yellow and orange is still my favorite!
Leave a comment with your favorite candy corn or candy corn recipe and you will be entered to win this candy corn prize -->
We will pick a winner next Saturday.


 Miss Kaitlyn: Well, my mom and dad have always taught me about God, but if you're asking when I asked Him into my heart I'd say I truly understood it when I was 10.


 Miss Kaitlyn: I mostly like poetry because I have seen many of the poems my mom has written and I wanted to be able to compose beautiful words like she does. It is a legacy in our family. My Aunt Julie, my mom, my grandmother, and even my great-grandmother all have written lots of beautiful poetry! I feel that poetry helps me express my emotions when I am not able to say it out loud.
 Miss Kaitlyn: My present goal is to complete my formal education although I never want to stop learning. I would like to learn the skills I will need to be a good wife and mother in my adult life. I hope to marry a Godly man and have as many children as God wants me to have. I would like to be a stay-at-home mom and homeschool my children. I hope I can use my writing, photography and other skills to bless my family now and in the future. I plan to always draw closer to God each and every day.


 It was called ENIAC which stands for Electronic Numerical Integrator and Calculator. It was built around 1937. The first one didn’t function, but they were happy when the second one was a success.
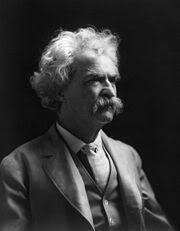 Mark Twain was born Samuel Langhorne Clemens on November 30, 1835 in Florida, Missouri. Mr. Twain was an American humorist, satirist, lecturer and writer. He is best-known for his novels, Adventures of Huckleberry Finn and The Adventures of Tom Sawyer. He is also known for his quips and quotes.
 We did some decorating in your favourite colours. Balloons, streamers, and boxes and box of gifts just for you!
 Remember to pray for the Fruits of the Spirit to be on your heart and the Armor of God over you. Remember to set a good example for your younger siblings and your friends. Remember to pray that the Lord will mold and make you into the woman, wife, and mother you will soon be.
